
05 Oct How to Verify Your Facebook Page
Have you ever noticed that some Facebook pages have a blue or grey check mark on their profile? This little check mark, which Facebook refers to as a badge, means that Facebook has “verified” the page as authentic. Not only does this little check mark help build trust with Facebook users, but having this check mark also helps populate your page higher in Facebook search results.
So, does your page have a check mark? If not, follow these steps to verify your page.
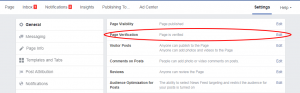
- Navigate to your page’s settings.

- From the “general” settings tab, the second option down is page verification. To verify your page, click edit.
- Click verify this page, then get started.
- Facebook will provide you with two ways to verify your page.
- Phone verification: You can enter the phone number associated with your page. Facebook will call this number and provide you with a verification code. Enter the code provided and you could be verified.
- Document verification: The more detailed option, Facebook may require you to provide business-related documents such as a business license or utility bill to confirm that your business is legitimate.
- Once you’ve submitted your code or business document, Facebook will begin verifying your page. This could take one to 45 days, but it’s well worth the time.
Please note that Facebook will ensure that your page meets all of its terms of service before verifying your page. Give them a quick read here to ensure you are in compliance. Some other things they will look for on your page include:
- A cover photo
- A profile photo
- Your business name follow’s Facebook’s guidelines
- There is content posted on your page
If you need any help navigating the verification process, drop me a line at Jennifer@germono.com. Happy verifying!